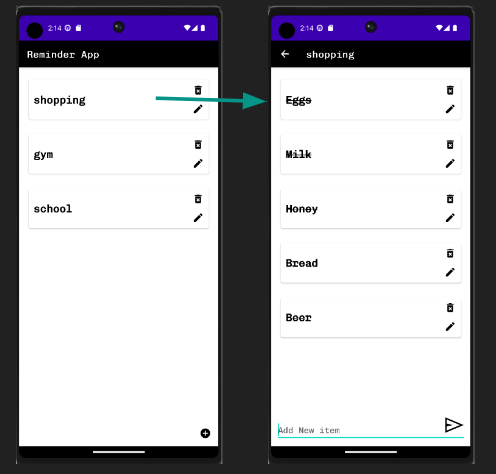
Reminder App
I had a lot of fun making this App. It was my first time using Android Studio, and building out the features and layouts really helped me become more familiar with the IDE. More importantly it got me better accustomed to Android Architecure, hopefully giving me a bit more context for the tests I’ll be developing for my team later down the line.
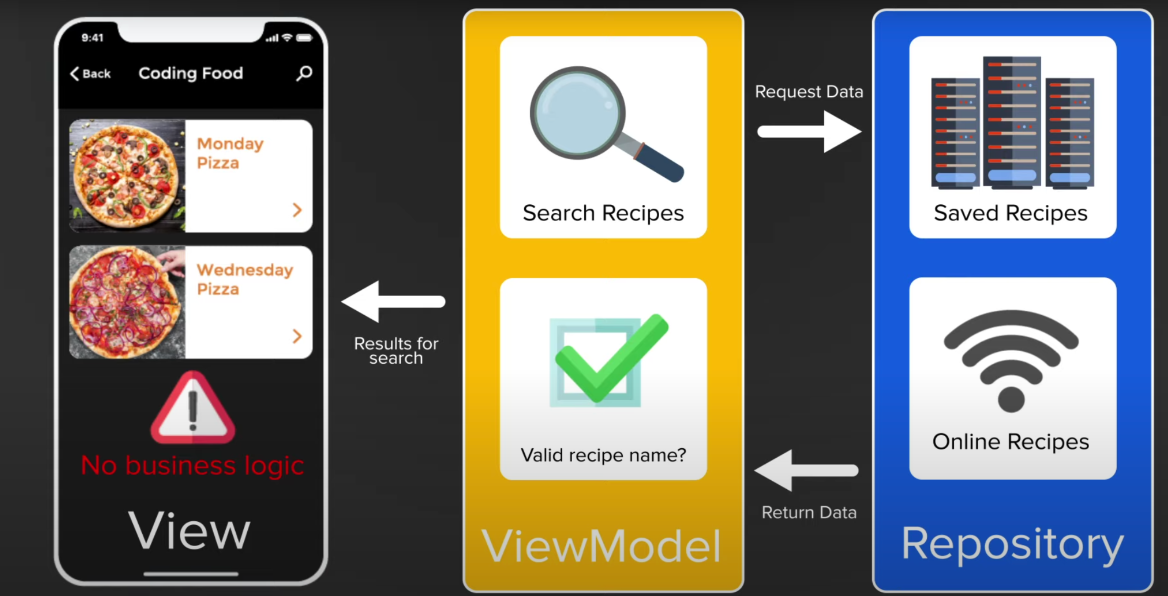
Model - View - ViewModel
I chose to structure the data for this app using MVVM. This was mainly because it was the one Google themselves suggested devs to use. The benefits of following an organized structure make programs and apps that you develop:
-
easy to understand
-
easy to extend
-
easy to test!
The Model in this case can be thought of as a collection of all the data we will be using in our application. In the picture below you can see that I represented it as a “repository” that contains the information that we need. The ViewModel gives us that business logic in our app such as filtering or searching through the data for a specific output or in response to a user input. The View block will then handle all of the code that has to do with what the user actually sees.
Model
For my Reminder App, I will be using the data generated by the user input. For this I’m going to need to create a local database that does the CRUD operations I want. For this I had to learn how to utilize the Android Room library.
Android Room
Android Room provides an abstraction layer over SQLite, making it simpler to interact with a database using SQL. The three major components of Room are as follows:
-
Entity - table/class
-
Data Access Object (DAO) - A mapping of SQL queries to functions
-
Database - connects the Entities to the DAO.
The following is the code for my Entity classes. You can see how I assigned attributes to each class below. The first attribute @PrimaryKey(autoGenerate = true) is important to auto generate ids for your classes:
@Entity
public class Items {

    @PrimaryKey(autoGenerate = true)
    public int uid;

    @ColumnInfo(name = "itemName")
    public String itemName;

    @ColumnInfo(name = "categoryId")
    public int categoryId;

    @ColumnInfo(name = "completed")
    public boolean completed;

}

@Entity
public class Category {

    @PrimaryKey(autoGenerate = true)
    public int uid;


    @ColumnInfo(name = "categoryName")
    public String categoryName;
}
The database is built using a boiler plate code that I pulled from the following Google dev site you can referencehere. You can see that you must include category and items class when I call @Database.
@Database(entities =  {Category.class, Items.class}, version = 1)
public abstract class  AppDatabase extends RoomDatabase {

    public abstract  ReminderListDao reminderListDao();

    public static AppDatabase INSTANCE;

    public static AppDatabase getDBinstance(Context context) {
        if(INSTANCE == null ) {
            INSTANCE = Room.databaseBuilder(context.getApplicationContext(), AppDatabase.class, "AppDB")
                    .allowMainThreadQueries()
                    .build();

        }

        return INSTANCE;
    }
}
The Data Access Object was written as follows. You can see that the methods for the Category and Item class are exactly the same. I planned on performing the same operation with them. The most important thing here is associating the items with a category-id and querying the items based off the category id attribute:
@Dao
public interface ReminderListDao {


    //categories
    @Query("Select * from Category")
    List<Category> getAllCategoriesList();

    @Insert
    void insertCategory(Category... categories);

    @Update
    void updateCategory(Category category);

    @Delete
    void deleteCategory(Category category);


    //items
    @Query("Select * from Items where categoryId = :catId")
    List<Items> getAllItemsList(int catId);

    @Insert
    void insertItems(Items... items);


    @Update
    void updateItems(Items items);

    @Delete
    void deleteItem(Items items);

}
This will create the database that we will interact with using the ViewModels.
ViewModel
Here I’m going to be implementing the functions that will actually relay the data the for the View to later represent. The functions used in the DAO are written here. The following is an example of how I wrote the getAllCategoryList() function.
public class MainActivityViewModel extends AndroidViewModel {

    private MutableLiveData<List<Category>> listOfCategory;
    private AppDatabase appDatabase;

    public MainActivityViewModel(Application application) {
        super(application);
        listOfCategory = new MutableLiveData<>();

        appDatabase = AppDatabase.getDBinstance(getApplication().getApplicationContext());
    }

    public MutableLiveData<List<Category>>  getCategoryListObserver() {
        return listOfCategory;
    }

    public void getAllCategoryList() {
        List<Category> categoryList=  appDatabase.reminderListDao().getAllCategoriesList();
        if(categoryList.size() > 0)
        {
            listOfCategory.postValue(categoryList);
        }else {
            listOfCategory.postValue(null);
        }
    }
View
The View for this app was deceptively deeper than I thought it would be. In order to get the app to display the list of tasks the way I wanted I had to implement a view library called RecyclerView.Although on the surface the concept is simple, it took a bit getting it to work the way I wanted.
RecyclerView
I started by putting a RecyclerView component in my activity_main.xml file.
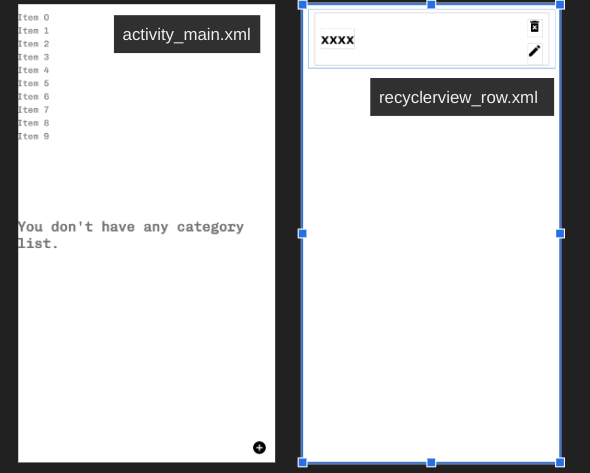
I also created a layout for the way I wanted the information displayed in the rows. I then placed this bit of code in the Main Activity.java to initiate the contents in ReycylerView:
    private void initRecyclerView() {
        recyclerView.setLayoutManager(new LinearLayoutManager(this));
        categoryListAdapter = new CategoryListAdapter(this, this);
        recyclerView.setAdapter(categoryListAdapter);
    }
    private void initViewModel() {
        viewModel = new ViewModelProvider(this).get(MainActivityViewModel.class);
        viewModel.getCategoryListObserver().observe(this, new Observer<List<Category>>() {
            @Override
            public void onChanged(List<Category> categories) {
                if(categories == null) {
                    noResulttextView.setVisibility(View.VISIBLE);
                    recyclerView.setVisibility(View.GONE);
                } else {
                    //show in the recyclerview
                    categoryListAdapter.setCategoryList(categories);
                    recyclerView.setVisibility(View.VISIBLE);
                    noResulttextView.setVisibility(View.GONE);
                }
            }
        });
    }
In order to connect your recycler view to the layout file you created for the row you while also being generated from a database you have to create an Adapter class. Although I made one each Categories and Items, I’ll share the start of my CategoryListAdapter here so you can get an idea of how I created it:
public class CategoryListAdapter extends RecyclerView.Adapter<CategoryListAdapter.MyViewHolder> {

    private Context context;
    private List<Category> categoryList;
    private HandleCategoryClick clickListener;

    public CategoryListAdapter(Context context, HandleCategoryClick clickListener) {
        this.context = context;
        this.clickListener = clickListener;
    }

    public void setCategoryList(List<Category> categoryList) {
        this.categoryList = categoryList;
        notifyDataSetChanged();
    }

    @NonNull
    @Override
    public CategoryListAdapter.MyViewHolder onCreateViewHolder(@NonNull ViewGroup parent, int viewType) {
        View view = LayoutInflater.from(context).inflate(R.layout.recyclerview_row, parent, false);
        return new MyViewHolder(view);
    }
Here’s a picture of the final product! Feel free to click on the image below to be sent to the repository. You can download the code and play around with it to see the features I’ve implemented.